Discover the secret to soft, authentic homemade hoagie rolls with our easy-to-follow PDF guide. Perfect for sandwiches, subs, and more, this recipe ensures fresh, delicious results every time.
Overview of Hoagie Rolls
Hoagie rolls are soft, chewy, and lightly sweet breads perfect for sandwiches, subs, and more. Originating in Philadelphia, they are a staple in delis and homes alike. Their golden crust and pillowy interior make them ideal for holding fillings without getting soggy. With just 7 simple ingredients, homemade hoagie rolls are easy to bake. The PDF guide provides step-by-step instructions, ensuring fresh, authentic results. Whether for classic subs or creative sandwiches, these rolls elevate any meal with their perfect texture and flavor.
Importance of Using a PDF Recipe
A PDF recipe for hoagie rolls offers convenience and clarity, providing a step-by-step guide with essential ingredients and instructions. It ensures accuracy and ease of use, making the baking process accessible to all skill levels. The printable format allows for quick reference in the kitchen, eliminating the need for screens. With a hoagie roll recipe PDF, you can achieve professional results at home, ensuring soft, chewy, and perfectly textured rolls for your favorite sandwiches. It’s a practical tool for bakers seeking consistency and delicious outcomes.
Benefits of Homemade Hoagie Rolls
Homemade hoagie rolls offer unparalleled freshness and texture, with a soft, pillowy interior and a golden, slightly crispy crust. They provide a customizable base for your favorite fillings, ensuring your sandwiches are never soggy. Baking at home allows you to control ingredients, catering to dietary preferences like whole wheat or gluten-free options. The satisfaction of creating something delicious from scratch is unmatched, and the aroma of freshly baked rolls elevates any meal. With a hoagie roll recipe PDF, achieving these benefits is simple and rewarding.

History and Origin of Hoagie Rolls
Originating in Philadelphia, hoagie rolls became a cultural staple, named the city’s official sandwich in 1992. Their rich history and evolution are detailed in our PDF guide.
Philadelphia Roots and Cultural Significance
Philadelphia is the birthplace of the hoagie roll, a staple in the city’s culinary culture. Named the official sandwich of Philadelphia in 1992, it embodies local tradition and pride. The hoagie roll recipe PDF captures this heritage, offering a timeless method to craft soft, chewy rolls perfect for authentic Philly-style sandwiches. Homemade hoagie rolls connect modern bakers to the city’s rich history, ensuring this beloved bread remains a cherished part of Philadelphia’s gastronomic identity for generations.
Evolution of Hoagie Rolls Over Time
Hoagie rolls have evolved from their Philadelphia roots, adapting to modern tastes while retaining their classic charm. Originally crafted with simple ingredients, today’s recipes often refine techniques for better texture and flavor. The hoagie roll recipe PDF reflects this evolution, offering precise methods to achieve the perfect balance of softness and crust. Over time, bakers have experimented with ingredients and baking practices, ensuring the hoagie roll remains a versatile and beloved staple in kitchens and sandwich shops alike.
Regional Variations in Hoagie Roll Recipes
Hoagie roll recipes vary by region, reflecting local tastes and traditions. Philadelphia-style rolls are soft and lightly sweetened, while New York-style versions often feature a firmer crust. Italian-inspired recipes may incorporate herbs or olive oil for added flavor. These regional twists are beautifully captured in the hoagie roll recipe PDF, offering bakers a diverse range of options to explore. Whether you prefer the classic Philly style or a modern variation, the PDF guide ensures authenticity and delicious results for every regional preference.

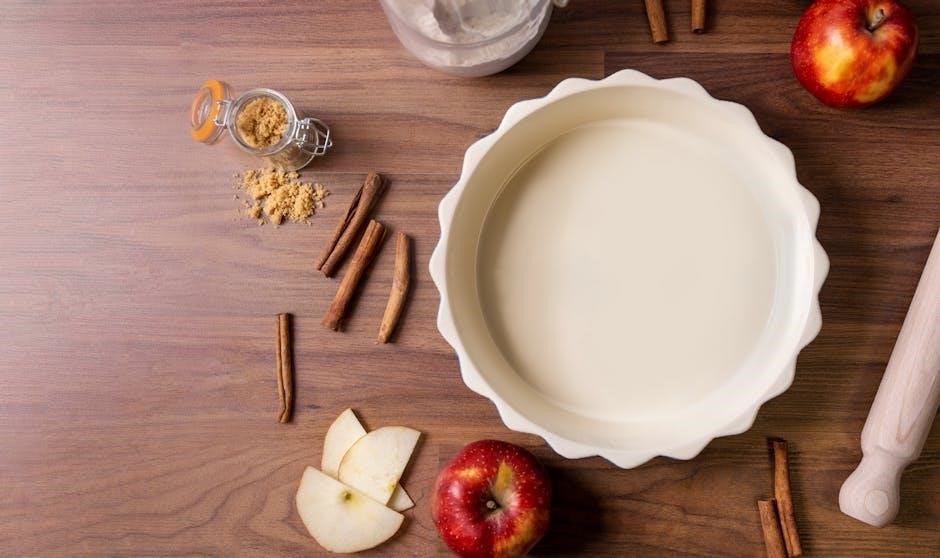
Ingredients for Hoagie Rolls
The essential ingredients for homemade hoagie rolls include all-purpose flour, warm water, sugar, yeast, and salt. Optional additions like olive oil or herbs enhance flavor and texture, as detailed in the hoagie roll recipe PDF.
Essential Ingredients List
The core ingredients for hoagie rolls include 3 1/2 cups of all-purpose flour, 1 cup of warm water (around 110°F), 2 tablespoons of sugar, and 1 tablespoon of active dry yeast. A pinch of salt enhances flavor. Optional additions like olive oil or herbs can add extra richness and aroma. These simple components, as outlined in the hoagie roll recipe PDF, ensure a soft, chewy texture and a lightly sweetened taste, perfect for sandwiches and subs. Proper measurement is key for consistent results.
Role of Yeast in Hoagie Roll Dough
Yeast is a vital ingredient in hoagie roll dough, driving the fermentation process that gives the rolls their light, airy texture. It feeds on sugars, producing carbon dioxide, which causes the dough to rise. Proper activation of yeast with warm water and sugar ensures optimal fermentation, leading to a soft, chewy interior. This process is crucial for achieving the characteristic texture of homemade hoagie rolls, as outlined in the hoagie roll recipe PDF.
Importance of Warm Water and Sugar
Warm water and sugar are essential for activating yeast in hoagie roll dough. The warm water (around 110°F) creates an ideal environment for yeast to thrive, while sugar provides the necessary nutrients for fermentation. This process kickstarts the dough’s rise, ensuring a light and airy texture. Proper proportions of warm water and sugar are critical, as outlined in the hoagie roll recipe PDF, to achieve the perfect balance for soft, chewy rolls that hold up to hearty fillings without becoming soggy.
Flour Types for Optimal Texture
The type of flour used significantly impacts the texture of hoagie rolls. All-purpose flour is commonly recommended in the hoagie roll recipe PDF for its balanced protein content, which ensures a soft yet sturdy crumb. Bread flour, with its higher protein level, can also be used for a chewier texture. The PDF guide often suggests using unbleached, all-purpose flour for the best results, as it provides the right structure and tenderness needed for authentic hoagie rolls that hold up to generous fillings without becoming dense or crumbly.
Additional Ingredients for Flavor Enhancement
Beyond the essentials, the hoagie roll recipe PDF suggests incorporating additional ingredients to elevate flavor. A touch of sugar enhances yeast activation and adds subtle sweetness, while salt balances the taste. Optional additions like garlic powder, Italian seasoning, or sesame seeds can provide extra depth and aroma. Some recipes even include butter or oil for richness. These enhancements ensure the hoagie rolls are not only soft and chewy but also packed with flavor, making them a perfect base for any sandwich creation.
Equipment Needed for Baking
Essential tools include baking sheets, parchment paper, a stand mixer or hand mixer, an oven, and measuring tools for precise ingredient proportions, ensuring a smooth baking process.
Baking Sheets and Parchment Paper
Baking sheets lined with parchment paper are essential for baking hoagie rolls. Lightly grease the paper to prevent sticking and ensure even baking. Arrange the rolls evenly, leaving space for expansion. Cover with a clean towel or plastic wrap during rising. After the second rise, spritz the rolls with water before baking to enhance crust texture. This setup promotes even browning and a golden finish, while the parchment makes cleanup effortless. Proper preparation ensures your hoagie rolls bake to perfection every time.
Stand Mixer vs. Hand Mixing

When preparing hoagie roll dough, a stand mixer with a dough hook attachment is ideal for efficient mixing and kneading, especially for large batches. It handles heavy dough effortlessly, ensuring even gluten development. However, hand mixing offers better control and a traditional approach, allowing you to feel the dough’s texture. Both methods yield great results, but a stand mixer saves time and effort. Choose based on your preference and available tools for a smooth, elastic dough that bakes into perfect hoagie rolls.
Oven Requirements for Baking
Preheat your oven to 375°F (190°C) for optimal baking results. A pizza stone or baking steel in the oven enhances crust texture. Place rolls on a parchment-lined sheet, leaving space for even baking. Bake for 15-20 minutes, or until golden brown. Ensure your oven is preheated fully before adding rolls for consistent cooking. Proper spacing and a single-layer arrangement are crucial for even browning and soft interiors. Rotate the sheet halfway through baking for uniform results. A well-prepared oven guarantees perfectly baked hoagie rolls every time.
Measuring Tools for Accuracy
Accurate measurements are crucial for achieving the perfect hoagie roll texture. Use a digital kitchen scale for precise flour measurements and a measuring cup for liquids like warm water. A measuring spoon ensures the right amount of sugar and yeast. Leveling ingredients with a straight edge prevents overpacking, which can lead to dense rolls. Invest in a measuring jug for mixing yeast and water accurately. Proper tools guarantee consistency and success in your hoagie roll recipe, making the baking process seamless and enjoyable.

Step-by-Step Baking Process
Follow our detailed guide to craft soft, chewy hoagie rolls. From activating yeast to baking, each step ensures perfect texture and flavor for your homemade creations.
Activating the Yeast
Start by combining warm water (110°F) and sugar in a bowl. Add the yeast, stirring gently to dissolve. Let it sit for 5-10 minutes until frothy and bubbly, indicating the yeast is active. This step is crucial for fermentation, ensuring the dough rises properly. Once frothy, the mixture is ready to be incorporated into the dry ingredients, forming the foundation of your hoagie roll dough. Proper activation ensures light, airy rolls with the perfect texture.
Mixing the Dough
Combine the activated yeast mixture with flour, salt, and any additional ingredients in a large bowl. Use a stand mixer with a dough hook or mix by hand until a shaggy dough forms. Gradually add more water if needed to achieve a sticky consistency. This step ensures all ingredients are well incorporated, creating a uniform dough that will develop into soft, chewy hoagie rolls. Proper mixing lays the foundation for a smooth, elastic dough ready for kneading.
Kneading Techniques for Smooth Dough
Kneading is crucial for developing gluten, ensuring smooth, elastic dough. Use a stand mixer with a dough hook for 10 minutes or knead by hand on a lightly floured surface. Push down, fold, and rotate the dough repeatedly. This process typically takes 10 minutes by hand or 5-7 minutes with a mixer. Avoid overworking to prevent toughness. The dough should become smooth and elastic, ready for its first rise. Proper kneading ensures the hoagie rolls will be soft and chewy with a light texture.
First Rise and Dough Relaxation
After kneading, place the dough in a lightly oiled bowl, cover it with plastic wrap or a damp cloth, and let it rise in a warm, draft-free area. The first rise typically takes 1-2 hours, or until the dough has doubled in size. This step allows the yeast to activate and the gluten to relax, resulting in a light, airy texture. Once risen, gently deflate the dough to release air bubbles, ensuring even distribution of ingredients. Proper dough relaxation is essential for easy shaping and a tender final product.
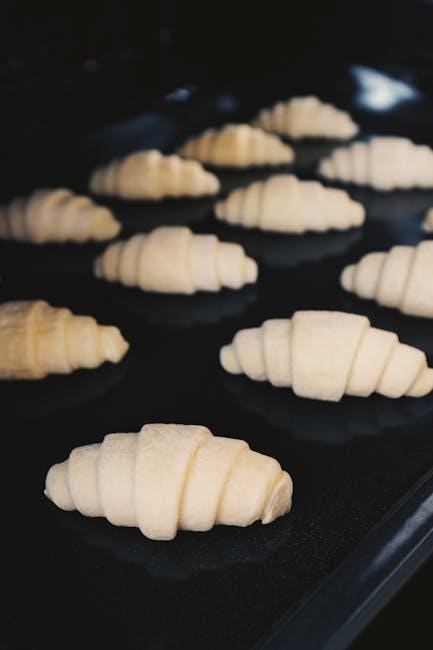
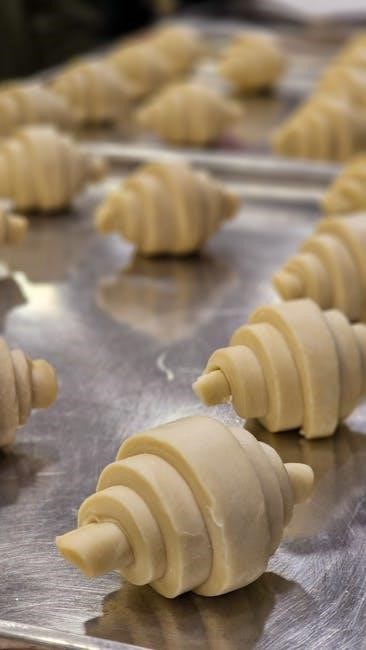
Shaping the Dough into Rolls
Once the dough has risen, divide it into 8-10 equal portions for standard-sized rolls. Roll each portion into a ball and gently flatten it into an oblong shape, about 6-8 inches long. Place the shaped rolls on a parchment-lined baking sheet, leaving space for expansion. Lightly tuck the edges under to create a smooth top. This step ensures even baking and a uniform texture. Proper shaping is key to achieving the classic hoagie roll appearance and structure.
Second Rise and Proofing
After shaping, place the rolls on a lightly greased, parchment-lined baking sheet, leaving space for expansion. Cover them with a clean towel or plastic wrap and let rise in a warm, draft-free area for 2-3 hours, or until noticeably puffy. This step, known as proofing, allows the dough to develop its final texture and flavor. Once risen, gently spritz the rolls with water to enhance crust texture. Proper proofing ensures the rolls bake evenly and retain their soft, chewy interior.

Baking to Perfection
Preheat your oven to 375°F (190°C). Place the proofed rolls on a lightly greased or parchment-lined baking sheet, leaving space for even baking. Bake for 15-20 minutes, or until the tops are golden brown. During baking, spritz the rolls with water to enhance crust texture and promote even browning. Avoid overbaking to maintain softness. Once baked, allow the rolls to cool slightly on a wire rack before slicing or serving. This step ensures a perfectly golden crust and a soft, chewy interior for your homemade hoagie rolls.
Cooling and Storage
After baking, allow the hoagie rolls to cool on a wire rack for 10-15 minutes before slicing or storing. This prevents sogginess and ensures a soft interior. Store cooled rolls in an airtight container at room temperature for up to 2 days or freeze for up to 2 months. Freeze before they dry out for optimal freshness. Thaw frozen rolls at room temperature or reheat in the oven for a crispy texture. Proper storage maintains their softness and flavor for later use.

Tips for Achieving the Perfect Hoagie Roll
- Use warm water and sugar to activate yeast for a light texture.
- Avoid overmixing dough to prevent toughness.
- Ensure even baking by spacing rolls apart.
- Brush with water before baking for a golden crust.
Importance of Measuring Ingredients
Accurate measurements are crucial for achieving the perfect hoagie roll texture and flavor. Too much flour can make rolls dense, while too little may result in a lack of structure. Use a digital scale for precision, especially for flour, as over-flouring is a common mistake. Measure warm water and sugar exactly to ensure proper yeast activation. Avoid overmixing, as this can lead to a tough crumb. Precise measurements guarantee the right balance of ingredients, resulting in soft, chewy rolls with a golden crust. Consistency is key to success in baking.
Creating the Right Environment for Rising
Creating the right environment for rising is essential for achieving light, airy hoagie rolls. Place the dough in a warm, draft-free area, ideally between 75°F and 80°F. Cover the dough with plastic wrap or a damp towel to retain moisture and promote even fermentation. A consistent temperature ensures the yeast ferments properly, leading to a soft, chewy texture. Avoid cold or windy spaces, as they can slow down the rising process. Proper conditions are key to achieving perfectly risen hoagie rolls every time.
Shaping Rolls for Even Baking
Shaping hoagie rolls correctly ensures even baking and a professional finish. Gently tug and tuck the dough to form smooth, firm tops. Place the rolls on a lightly greased parchment-lined sheet or silicone mat, leaving space for expansion. Cover with plastic wrap or a clean towel to prevent drying. Allow the rolls to rise in a warm, draft-free area for 2-3 hours, or until noticeably puffy. Proper shaping and spacing ensure uniform baking, resulting in soft, chewy interiors and golden, even crusts.
Achieving the Ideal Crust Texture
Achieving the perfect crust texture for hoagie rolls requires attention to detail. Bake the rolls in a preheated oven at 375°F (190°C) for 12-15 minutes, or until golden brown. Lightly spritz the rolls with water before baking to enhance crust formation. Avoid overbaking, as this can lead to a hard, crunchy exterior. For an extra-crispy crust, bake for an additional 2-3 minutes, then cool on a wire rack. Proper baking techniques ensure a golden, even crust that complements the soft interior.
Maintaining Freshness and Softness
To keep hoagie rolls fresh and soft, cool them on a wire rack after baking to prevent sogginess. Store in an airtight container or plastic bag at room temperature for up to 2 days. For longer freshness, freeze the rolls in a sealed bag or container for up to 2 months. When freezing, place rolls in a single layer to avoid sticking. To revive frozen rolls, thaw at room temperature or reheat in the oven at 350°F (175°C) for 5-7 minutes. Proper storage ensures softness and freshness for your homemade hoagie rolls.
Hoagie Roll Recipe PDF Guide
Download our convenient hoagie roll recipe PDF for easy access to step-by-step instructions and essential ingredients. Perfect for bakers of all skill levels to create delicious homemade rolls.
Downloading the PDF Recipe
Downloading the hoagie roll recipe PDF is quick and easy, providing instant access to a step-by-step guide. The PDF includes a list of 7 simple ingredients and 7 easy-to-follow steps, ensuring you can make delicious homemade rolls. Printer-friendly and concise, it’s perfect for kitchen use. Whether you’re a beginner or an experienced baker, this guide simplifies the process. Click the download link, save it to your device, and start baking soft, chewy hoagie rolls whenever you want. It’s your key to perfect homemade sandwiches!
Why a PDF Guide is Useful
A PDF guide for hoagie roll recipes is incredibly convenient, offering a clear, step-by-step format that’s easy to follow. It provides a comprehensive list of ingredients and instructions, ensuring you never miss a detail. The PDF is printer-friendly, making it perfect for kitchen use. With a PDF, you can easily access the recipe anytime, even without internet. It’s a great resource for bakers of all skill levels, helping you achieve soft, chewy, and perfectly textured homemade hoagie rolls every time. This format ensures clarity and simplicity for the best baking results.
How to Use the PDF for Best Results
For optimal results, print the PDF guide and keep it handy in the kitchen. Follow the step-by-step instructions carefully, ensuring all ingredients are pre-measured. Use the guide to track your progress and refer back as needed. The PDF’s clear layout makes it easy to follow, even for beginners. Having the recipe in print avoids screen distractions, allowing you to focus on crafting soft, chewy hoagie rolls. This organized approach guarantees consistent, delicious outcomes every time you bake.

Regional Variations of Hoagie Rolls
Explore Philadelphia-style, New York-style, and Italian-inspired hoagie rolls, each offering unique textures and flavors. From soft, chewy interiors to crispy crusts, these variations elevate your sandwich game.
Philadelphia-Style Hoagie Rolls
Philadelphia-style hoagie rolls are iconic, known for their soft, chewy interior and lightly crispy crust. Originating in Philly, these rolls are a staple for authentic subs. Made with simple ingredients like flour, water, sugar, and yeast, they’re lightly sweetened to balance savory fillings. The dough is shaped into long, oblong forms, creating the perfect base for classic Philly cheesesteaks or Italian subs. Their texture and flavor make them a must-try for sandwich enthusiasts, ensuring a truly authentic experience.
New York-Style Hoagie Rolls
New York-style hoagie rolls are known for their hearty, slightly firmer texture and chewy interior. They often feature a golden, crispy crust achieved through precise baking techniques. Unlike Philadelphia-style rolls, New York-style versions may incorporate a bit more yeast for a lighter rise and a slightly sweeter flavor. Baked to perfection in high-temperature ovens, these rolls are a favorite in NYC delis and sub shops, offering a robust base for hearty subs and sandwiches, making them a staple in the city’s culinary scene.
Italian-Inspired Hoagie Rolls
Italian-inspired hoagie rolls bring a Mediterranean twist to the classic recipe. These rolls often incorporate olive oil, herbs like rosemary or oregano, and sometimes grated Parmesan for added flavor. The dough may include a touch of Italian seasoning, giving the rolls a aromatic scent and a slightly savory taste. Baked to a golden crust, they pair perfectly with cured meats, fresh vegetables, and Italian cheeses. This variation offers a delicious blend of traditional Italian flavors with the soft, chewy texture of classic hoagie rolls, making them a versatile choice for sandwiches and subs.
Healthier Options for Hoagie Rolls
Explore healthier hoagie roll options with whole wheat, low-calorie, and gluten-free recipes. These alternatives offer nutritious twists without compromising on flavor or texture.
Whole Wheat Hoagie Rolls
Whole wheat hoagie rolls offer a healthier twist, packed with fiber and nutrients. Using whole wheat flour adds a nuttier flavor and denser texture while maintaining softness. This option is ideal for those seeking a more wholesome alternative without sacrificing taste. The subtle earthiness of whole wheat complements savory fillings perfectly, making it a great choice for health-conscious sandwich lovers. Download the PDF recipe to explore this nutritious variation and enjoy guilt-free homemade hoagies.
Low-Calorie Hoagie Roll Alternatives
For a lighter option, try low-calorie hoagie rolls by reducing sugar and using lighter flour blends. Substitute some all-purpose flour with whole wheat or oat flour for added fiber. Use egg whites instead of whole eggs to cut cholesterol and calories. These adjustments create a softer, healthier roll without compromising flavor. The PDF recipe guide offers tips to balance ingredients for a guilt-free treat. Perfect for fitness enthusiasts, these rolls maintain their softness while keeping calorie counts in check.
Gluten-Free Hoagie Roll Recipes
Enjoy gluten-free hoagie rolls by substituting traditional flour with gluten-free alternatives like almond, coconut, or rice flour. Add xanthan gum for texture and elasticity. The PDF recipe guide provides step-by-step instructions to ensure light, soft rolls. Perfect for those with dietary restrictions, these rolls maintain the classic flavor while catering to gluten-free needs. Follow the guide for tips on achieving the perfect rise and texture, making them ideal for sandwiches and subs without compromising taste or quality.
Troubleshooting Common Issues
Solve common issues like dense rolls, crumbly crusts, or poor rise with expert tips from our hoagie roll recipe PDF, ensuring perfect results every time.
Why Hoagie Rolls Become Too Dense
Hoagie rolls can become too dense due to overmixing the dough, which develops excess gluten, or using too much flour. Ensure accurate measurements and mix just until ingredients combine to avoid this issue.
Fixing a Too-Crumbly Crust
A too-crumbly crust on hoagie rolls can result from overbaking or using too little water. To fix this, ensure the dough has the right moisture by adding a little more water if needed. Also, avoid overbaking—rolls are done when lightly golden. Proper proofing and even baking temperatures help maintain a soft interior and a crust that’s crispy but not crumbly. Adjusting the ratio of flour to water and monitoring oven heat can also prevent this issue.
Solving Dough Rising Problems
Dough rising issues often stem from inactive yeast, incorrect temperatures, or insufficient sugar. Ensure yeast is fresh and activated properly in warm water (around 110°F). Avoid cold environments, as this slows fermentation. Check that sugar is present to feed the yeast. Overmixing can also hinder rise, so mix dough just until combined. If dough isn’t rising, try placing it in a warm, draft-free area or adding a little more yeast. Proper conditions and ingredients are key to achieving light, airy hoagie rolls.